Measuring soil moisture with the NodeMCU Amica (ESP8266)
In this tutorial, we'll use a NodeMCU Amica (ESP8266 based development board) and a Funduino moisture sensor to measure soil moisture, and build a Wia Flow that notifies you when your plants need watering.
Before you begin
To get set up with the NodeMCU Amica, you'll need to follow our tutorial on getting started with the ESP8266. It details setting up the correct environment to complete the rest of this tutorial.
Connecting the hardware
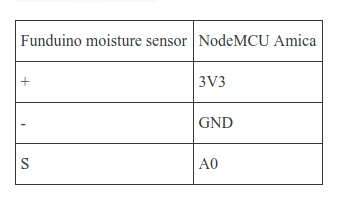
Use jumper wires to connect the moisture sensor to the board as follows:
Install the required libraries
In the Arduino IDE, Go to Sketch > Include Libraries > Manage Libraries.
Install each of the following libraries by searching for their name in the search bar within the modal. A button will appear in the bottom right of the box that will allow you to install the library.
The Code
In the Arduino IDE, copy and paste the following code:
Replace the values of the following variables (Place the correct value between the quotation marks right of the variable names in the code):
Make sure the correct board is selected - go to tools > board and select NodeMCU 1.0 (ESP-12E Module).
Make sure the correct port is selected - tools > port.
If either of those steps are not working for you, refer back to our tutorial on getting started with the ESP8266.
Click Sketch > Upload in the menu.
Breaking changes in ArduinoJson 6.0
The latest version of ArduinoJson contains a breaking change which will cause an error in the code above. If you get an error (such as 'StaticJsonBuffer' does not name a type) when compiling the code, head over to this article to see how to fix it.
Go to your Wia dashboard and view the Events as they come in via the Device debugger.
Notifying you when your plant needs watering
Next, we'll set up a Flow that will send a notification to your phone when the moisture level drops below a certain threshold. The Wia app is required to send a push notification to your phone, it can be installed here for Android.
Go to your Wia Dashboard and click Flows in the left hand side menu. Create a new Flow with any name you like.
In Flow Studio, drag an Event node from the triggers section and:

Drag a function node from the logic section and copy and paste the following code:
The output from the soil moisture sensor is a number between 0 and 1023 with 0 being completely dry and 1023 being completely wet.
The code above tells Wia to only process the input if it is less than 500 (i.e. the doesn't plant need watering).
Finally, add a notification node and enter The plant needs watering in the text field so that Wia can send a notification to you when your plant needs watering.

Taking it One Step Further
Here's just one way you could take this project to the next level: we're going to feed our moisture data into two Widgets on the Wia Dashboard, in addition to sending the notification.
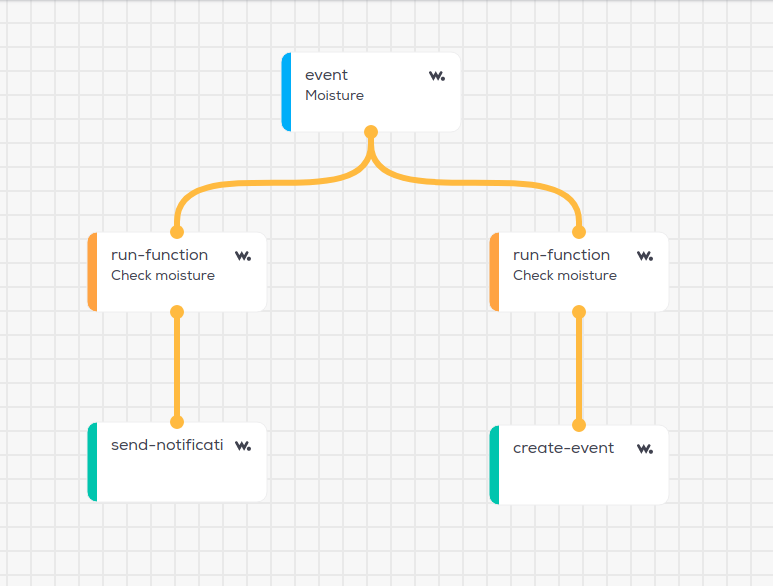
First, add another function node from the logic section, and connect it to the same event. In this node, paste the following code:
This code outputs 'Thirsty' if the plant needs watering, and 'Ok' otherwise. We're now going to connect the output of this function node to a new event action node. Drag one over from the 'actions' section (not 'triggers'). This will create a new event. Give the event a name (such as status), and connect the function node to it.
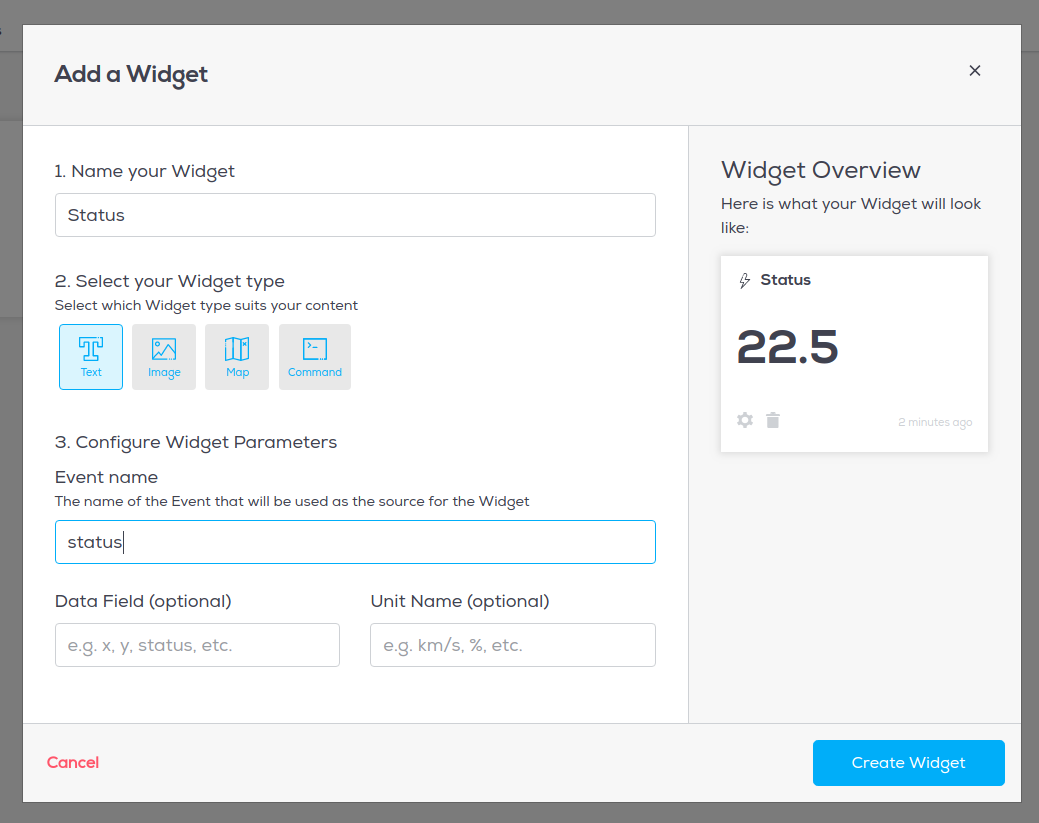
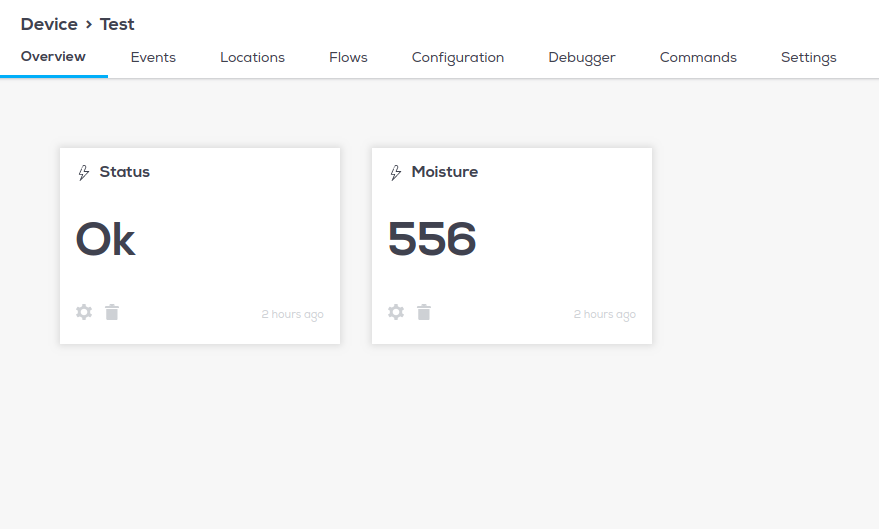
Next, head over to your Device's 'Overview' tab. Click 'Add a Widget'. Give the Widget a name ('Status'), choose Widget type 'text', and enter the name of the Event that you created in your Flow (status).
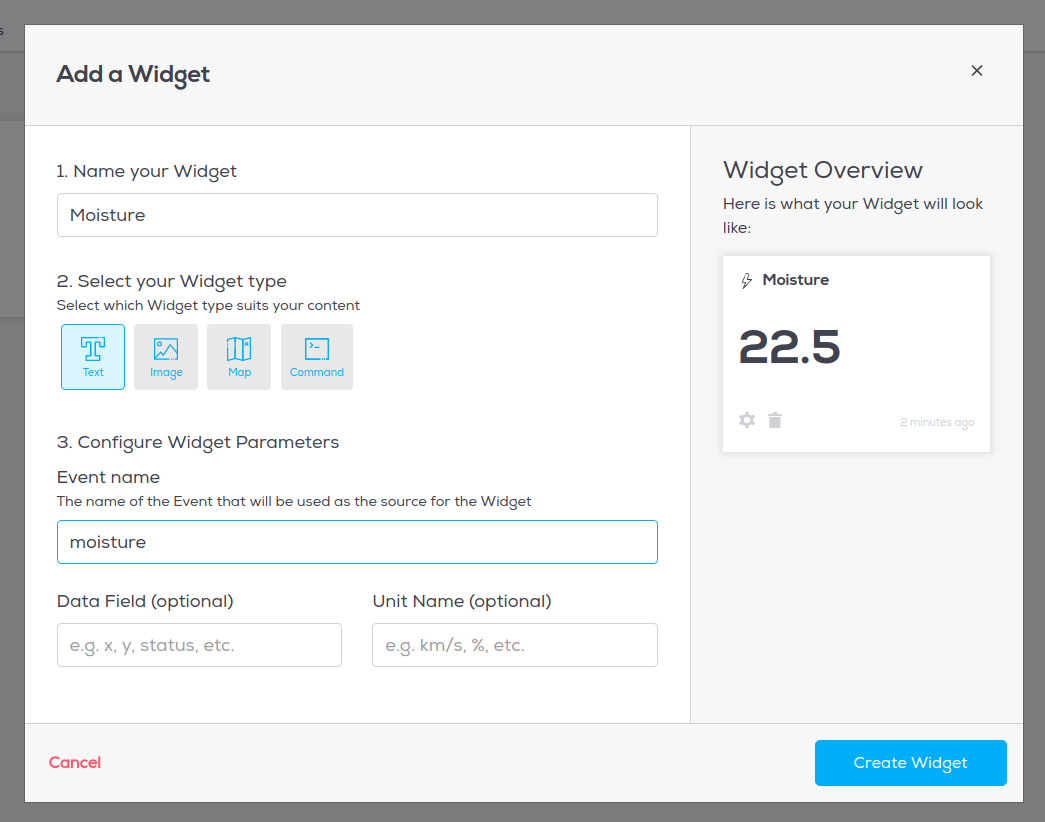
Create another Widget of type 'text', give it a name ('Moisture') and enter the name of your original Event trigger (moisture).
Now, when your events are published, the Widgets on your Device overview page will update in real time!
Before you begin
To get set up with the NodeMCU Amica, you'll need to follow our tutorial on getting started with the ESP8266. It details setting up the correct environment to complete the rest of this tutorial.
Connecting the hardware
Use jumper wires to connect the moisture sensor to the board as follows:

Install the required libraries
In the Arduino IDE, Go to Sketch > Include Libraries > Manage Libraries.
Install each of the following libraries by searching for their name in the search bar within the modal. A button will appear in the bottom right of the box that will allow you to install the library.
- ArduinoJson
ESP8266WiFi
ArduinoHttpClient
If a library doesn't show up in the results when you search it, you may need to update your Arduino IDE version. You can download the latest version here.
The Code
In the Arduino IDE, copy and paste the following code:
Code: Select all
#include <ArduinoJson.h>
#include <ESP8266WiFi.h>
#include <ArduinoHttpClient.h>
#include <Arduino.h>

const char* ssid     = "your-ssid"; // Your WiFi ssid
const char* password = "your-password"; //Your Wifi password

// Get this secret key from the wia dashboard. It should start with `d_sk`
const char* device_secret_key = "your-device-secret-key";

// Wia API parameters
char server[] = "api.wia.io";
char path[] = "/v1/events";
int port = 80;

WiFiClient client;
int status = WL_IDLE_STATUS;

StaticJsonBuffer<200> jsonBuffer;
HttpClient httpClient = HttpClient(client, server, port);
JsonObject& root = jsonBuffer.createObject();
String response;
int statusCode = 0;
String dataStr;
const int ANALOG_PIN = 0;

void setup() {

  // initialize serial communications and wait for port to open:
  Serial.begin(115200);
  while (!Serial) {
    ; // wait for serial port to connect. Needed for native USB port only
  }
  WiFi.begin(ssid, password);
  Serial.print("Attempting to connect to SSID: ");
  Serial.print(ssid);
  // attempt to connect to WiFi network:
  while (WiFi.status() != WL_CONNECTED) {
    Serial.print(".");
    // Connect to WPA/WPA2 network. Change this line if using open or WEP  network:
    // wait 5 seconds for connection:
    delay(5000);
  }

  Serial.print("IP address: ");
  Serial.println(WiFi.localIP());
  Serial.println("connecting...");
}

// Thing function runs continiously
void loop() {

  root["name"] = "moisture";
  root["data"] =  analogRead (ANALOG_PIN);

  // if you get a connection, report back via serial:
  if (client.connect(server, port)) {

    sendToWia(root);

  } else {
    // if you didn't get a connection to the server:
    Serial.println("connection failed");
  }
  delay(1000*15*60); // Wait for 15 minutes to post again
}

// Adds the correct headers for HTTP and sends Data to Wia
void sendToWia(JsonObject& data) {
  data.printTo(dataStr);
  httpClient.beginRequest();
  httpClient.post(path);
  httpClient.sendHeader("Content-Type", "application/json");
  httpClient.sendHeader("Content-Length", data.measureLength());
  httpClient.sendHeader("Authorization", "Bearer "  + String(device_secret_key));
  httpClient.beginBody();
  httpClient.print(dataStr);
  httpClient.endRequest();
}
Replace the values of the following variables (Place the correct value between the quotation marks right of the variable names in the code):
- your-ssid - with your WiFi network name
your-password - with your WiFi network password
your-device-secret-key with your device secret key from the Wia Dashboard (the one that begins with d_sk)
Make sure the correct board is selected - go to tools > board and select NodeMCU 1.0 (ESP-12E Module).
Make sure the correct port is selected - tools > port.
If either of those steps are not working for you, refer back to our tutorial on getting started with the ESP8266.
Click Sketch > Upload in the menu.
Breaking changes in ArduinoJson 6.0
The latest version of ArduinoJson contains a breaking change which will cause an error in the code above. If you get an error (such as 'StaticJsonBuffer' does not name a type) when compiling the code, head over to this article to see how to fix it.
Go to your Wia dashboard and view the Events as they come in via the Device debugger.
Notifying you when your plant needs watering
Next, we'll set up a Flow that will send a notification to your phone when the moisture level drops below a certain threshold. The Wia app is required to send a push notification to your phone, it can be installed here for Android.
Go to your Wia Dashboard and click Flows in the left hand side menu. Create a new Flow with any name you like.
In Flow Studio, drag an Event node from the triggers section and:
- Enter moisture as the the Event Name
Add the Device that matches the one you added to the code earlier

Drag a function node from the logic section and copy and paste the following code:
Code: Select all
// Check moisture levels
if (input.body.data && input.body.data < 500) {
  // Plant is thirsty
  output.process = true;
} else {
  // Plant is ok
  output.process = false;
}
The output from the soil moisture sensor is a number between 0 and 1023 with 0 being completely dry and 1023 being completely wet.
The code above tells Wia to only process the input if it is less than 500 (i.e. the doesn't plant need watering).
Finally, add a notification node and enter The plant needs watering in the text field so that Wia can send a notification to you when your plant needs watering.

Taking it One Step Further
Here's just one way you could take this project to the next level: we're going to feed our moisture data into two Widgets on the Wia Dashboard, in addition to sending the notification.
First, add another function node from the logic section, and connect it to the same event. In this node, paste the following code:
Code: Select all
// Check moisture levels
if (input.body.data && input.body.data < 500) {
  // Plant is thirsty
   output.body.data = "Thirsty";
} else {
  // Plant is ok
   output.body.data = "Ok";
}
This code outputs 'Thirsty' if the plant needs watering, and 'Ok' otherwise. We're now going to connect the output of this function node to a new event action node. Drag one over from the 'actions' section (not 'triggers'). This will create a new event. Give the event a name (such as status), and connect the function node to it.

Next, head over to your Device's 'Overview' tab. Click 'Add a Widget'. Give the Widget a name ('Status'), choose Widget type 'text', and enter the name of the Event that you created in your Flow (status).

Create another Widget of type 'text', give it a name ('Moisture') and enter the name of your original Event trigger (moisture).

Now, when your events are published, the Widgets on your Device overview page will update in real time!
