Simple DHT-22 temp and Humidity transmitter to MQTT
I wanted to make a very simple (code wise) ESP8266 MQTT transmitter to use with my OpenHAB setup I have once a minute and I couldn't find much that where not over complicated so here is my code for others to use. I used The Arduino IDE. I'll update more as I have time. If anyone sees anything bad with the code please let me know as I am no expert in codeing.
Here is the stripped down just works version.
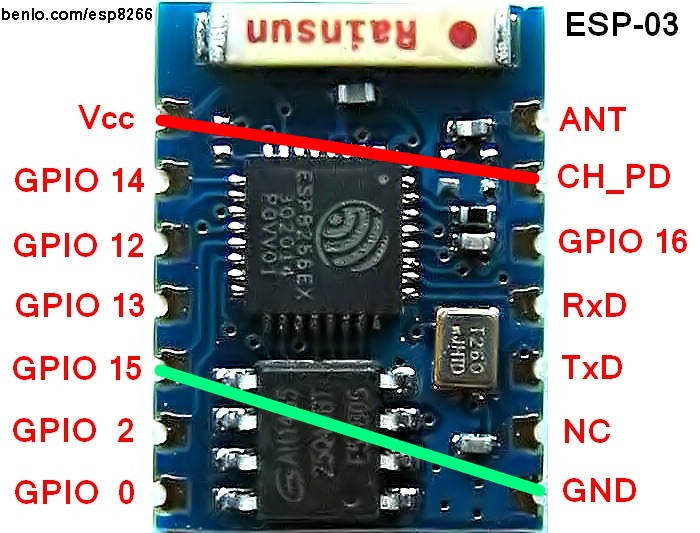
Here is what my test setup looks like I am currently designing a board to house everything.
EDIT: add code with comments/2 add photo/3 add clientconnect
Code: Select all
/* Started with Basic MQTT example */

#include <ESP8266WiFi.h>      //ESP library from http://github.com/esp8266/Arduino
#include <PubSubClient.h>      // MQTT library from http://github.com/Imroy/pubsubclient
#include <DHT.h>      // DHT library from http://github.com/adafruit/DHT-sensor-library
                      // Written by ladyada, public domain

#define DHTPIN 2     // what pin we're connected to

// Uncomment whatever type you're using!
//#define DHTTYPE DHT11   // DHT 11
#define DHTTYPE DHT22
//#define DHTTYPE DHT21   // DHT 21 (AM2301)

// Initialize DHT sensor for normal 16mhz Arduino
//DHT dht(DHTPIN, DHTTYPE);
// NOTE: For working with a faster chip, like an Arduino Due or Teensy, you
// might need to increase the threshold for cycle counts considered a 1 or 0.
// You can do this by passing a 3rd parameter for this threshold.  It's a bit
// of fiddling to find the right value, but in general the faster the CPU the
// higher the value.  The default for a 16mhz AVR is a value of 6.  For an
// Arduino Due that runs at 84mhz a value of 30 works.
// Example to initialize DHT sensor for ESP8266:
DHT dht(DHTPIN, DHTTYPE, 20);


const char *ssid =   "********";      // cannot be longer than 32 characters!
const char *pass =   "********";      //
long previousMillis = 0;      // Timer loop from http://www.arduino.cc/en/Tutorial/BlinkWithoutDelay
long interval = 60000;        //
IPAddress server(192, 168, 2, 15);    // Update these with values suitable for your network.
PubSubClient client(server);

void setup(){
  // Setup console
  Serial.begin(115200);
  delay(10);
  Serial.println();
  Serial.println();
  dht.begin();
  WiFi.begin(ssid, pass);
  int retries = 0;
  while ((WiFi.status() != WL_CONNECTED) && (retries < 10)) {
    retries++;
    delay(500);
    Serial.print(".");
  }
  if (WiFi.status() == WL_CONNECTED) {
    Serial.println("");
    Serial.println("WiFi connected");
  }
client.connect("clientName");
}

void loop(){
  client.loop();
  unsigned long currentMillis = millis();
    if(currentMillis - previousMillis > interval) {
      // Reading temperature or humidity takes about 250 milliseconds!
      // Sensor readings may also be up to 2 seconds 'old' (its a very slow sensor)
      float h = dht.readHumidity();
      // Read temperature as Celsius
      //float t = dht.readTemperature();
      // Read temperature as Fahrenheit
      float f = dht.readTemperature(true);
        // Check if any reads failed and exit early (to try again).
        if (isnan(h) || isnan(f)) {
          Serial.println("Failed to read from DHT sensor!");
          return;
        }
      previousMillis = currentMillis;
      Serial.println("DTH sensor read and transmitted");
      client.publish("m_bed/temperature",String(f));
      client.publish("m_bed/humidity",String(h));
  }
}
Here is the stripped down just works version.
Code: Select all
#include <ESP8266WiFi.h>
#include <PubSubClient.h>
#include <DHT.h>
DHT dht(2, DHT22, 20);
const char *ssid =   "********";
const char *pass =   "********";
long previousMillis = 0;
long interval = 60000;
IPAddress server(192, 168, 2, 15);
PubSubClient client(server);

void setup(){
  dht.begin();
  WiFi.begin(ssid, pass);
client.connect("clientName");
}

void loop(){
  client.loop();
  unsigned long currentMillis = millis();
    if(currentMillis - previousMillis > interval) {
      float h = dht.readHumidity();
      float f = dht.readTemperature(true);
        if (isnan(h) || isnan(f)) {
          return;
        }
      previousMillis = currentMillis;
      client.publish("m_bed/temperature",String(f));
      client.publish("m_bed/humidity",String(h));
  }
}
Here is what my test setup looks like I am currently designing a board to house everything.
EDIT: add code with comments/2 add photo/3 add clientconnect
