Esp8266 Loading OLED Images from SPIFFS
Esp8266 have a very good file system. But it is hard for newbies. 
So i discovered a way to load Oled XBM Image files From Spiffs Filesystem.
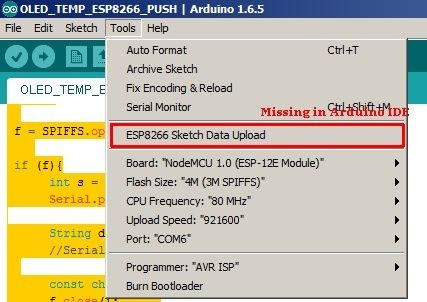
Esp8266 Repo Did not included the Spiffs Upload Tool which is required for making and uploading Files to Esp8266 FileSystem.
To Upload Files to Spiffs (Esp8266 File System) you need esp8266fs.jar Placed like:
Program files/Arduino/tools/ESP8266FS/tool/esp8266fs.jar
Download: https://github.com/esp8266/arduino-esp8 ... -0.2.0.zip
Check Updates: https://github.com/esp8266/arduino-esp8 ... n/releases - See more at: viewtopic.php?f=32&t=10081#sthash.ttZLKIb7.dpuf
Schematics:
Mine Blue OLED Pins:
Gnd > NodeEsp G or Gnd
Vcc > 3V
SCL > D5
SDA > D7
DHT22 Front View Pins on Bottom :
From Left Side:
1: 3V
2: D1
3:Not Used
4: Nodemcu G or Gnd
Power it from Usb and Open Arduino 1.6.5 or Up
The code is a Temperature & Humidity OLED Display and Pushbullet Notifications on Over Temperature.
I have added Code For : DHT22, PushBullet , WifiManager, Oled , SPIFFS.
This is what i tried. You can modify the Sizes according to your needs.
Make a image of 125*61 with paint and save it as bmp Monocrome Bitmap.
Visit http://www.online-utility.org/image/convert/to/MONO
Upload this file and make a mono file.
Now Save your sketch, Go to Sketch Data Folder By Pressing Sketch > Show Sketch Folder
Create a new folder and name it "data".
Save this .mono file to this data folder.

Now press Tools > Esp8266 Sketch Data Upload
After completed, Upload the Sketch, Open Serial Monitor and have fun.
So i discovered a way to load Oled XBM Image files From Spiffs Filesystem.
Esp8266 Repo Did not included the Spiffs Upload Tool which is required for making and uploading Files to Esp8266 FileSystem.
To Upload Files to Spiffs (Esp8266 File System) you need esp8266fs.jar Placed like:
Program files/Arduino/tools/ESP8266FS/tool/esp8266fs.jar
Download: https://github.com/esp8266/arduino-esp8 ... -0.2.0.zip
Check Updates: https://github.com/esp8266/arduino-esp8 ... n/releases - See more at: viewtopic.php?f=32&t=10081#sthash.ttZLKIb7.dpuf
Schematics:
Mine Blue OLED Pins:
Gnd > NodeEsp G or Gnd
Vcc > 3V
SCL > D5
SDA > D7
DHT22 Front View Pins on Bottom :
From Left Side:
1: 3V
2: D1
3:Not Used
4: Nodemcu G or Gnd
Power it from Usb and Open Arduino 1.6.5 or Up
The code is a Temperature & Humidity OLED Display and Pushbullet Notifications on Over Temperature.
I have added Code For : DHT22, PushBullet , WifiManager, Oled , SPIFFS.
Code: Select all
#include <Wire.h>
#include <SPI.h>
#include <ESP8266WiFi.h>
#include <FS.h>
#include "SSD1306.h"
#include "SSD1306Ui.h"
#include <PushBullet.h>
#include <WiFiClientSecure.h>
#include <DNSServer.h>
#include <ESP8266WebServer.h>
#include "WiFiManager.h"
#include "DHT.h"


#define PORT 443

int incomingByte = 0;

WiFiClientSecure client;

// PUT YOUR PUSHBULLET API HERE

PushBullet pb = PushBullet("----------API---------------", &client, 443);


// CALLBACK ON AUTOCONFIG
void configModeCallback (WiFiManager *myWiFiManager) {
  Serial.println("Entered config mode");
  Serial.println(WiFi.softAPIP());

  Serial.println(myWiFiManager->getConfigPortalSSID());
}


//DHT22 ON NODEMCU PIN D1
#define DHTPIN D1
#define DHTTYPE DHT22
DHT dht(DHTPIN, DHTTYPE);

// 128x64 OLED ON I2C

#define OLED_SDA    D7
#define OLED_SDC    D5
#define OLED_ADDR   0x3C

SSD1306   display(OLED_ADDR, OLED_SDA, OLED_SDC);    // For I2C


int x = 0;
long lastm = 0;
long lastm1 = 0;


void setup() {

  // LOAD DISPLAY
  display.init();
  display.flipScreenVertically();

  Serial.begin(9600);


  // LOAD FILESYSTEM
  if (!SPIFFS.begin()) {
    Serial.println("Failed to mount file system");

  }

  File f;
  // OPEN FILE (ENTER FILE WITH PATH WIRH SLASH IN FRONT)
  f = SPIFFS.open("/file.mono", "r");

  if (f) {
    int s = f.size();
    Serial.printf("File Opened , Size=%d\r\n", s);

    String data = f.readString();
    //Serial.println(data);

    const char* data1 = data.c_str();
    f.close();


    display.drawXbm(0, 0, 125, 60, data1);
    display.display();

    //DISPLAY TILL WIFI CONNECTION

  } else {
    Serial.println("File Not Opened");
  }


  // CONNECT WIFI WifiManager (AUTO SETUP)
  connect();

  //PUSHBULLET CONNECTION
  pb.openConnection();

  if (!pb.checkConnection()) {
    Serial.println("Failed to connect to pushbullet.com");
    return;
  } else {
    Serial.println("Connected to pushbullet.com");
  }

  //DHT22 SETUP
  dht.begin();

}


void loop() {
  // UPDATE TEMP EVERY 5 SECS
  if (((micros() - lastm) / 1000000) > 5 || lastm == 0) {
    show();
    lastm = micros();
  }
}


void connect() {
  // AUTO WIFI SETUP WITH AP (Connect ESPxxxxx WIFI AP and OPEN 192.168.4.1 AND FILL WIFI PASSWORD)
  WiFiManager wifiManager;
  wifiManager.setAPCallback(configModeCallback);
  Serial.println("Connecting...");
  if (!wifiManager.autoConnect()) {
    Serial.println("failed to connect and hit timeout");
  }
  Serial.println("connected...yeey :)");
}


bool show() {
  // UPDATE OLED TEMP

  display.clear();

  // Read temperature as Celsius
  float t = dht.readTemperature();
  //Convert Float to Char
  char temp[3];
  itoa(t, temp, 10);

  // Read Humidity
  float h = dht.readHumidity();
  //Convert Float to Char
  char hum[3];
  itoa(h, hum, 10);

  display.setColor(WHITE);
  display.setTextAlignment(TEXT_ALIGN_LEFT);
  display.setFont(ArialMT_Plain_16);
  display.drawString(10,  10, "Temp      Hum");

  display.setColor(WHITE);
  display.setTextAlignment(TEXT_ALIGN_LEFT);
  display.setFont(ArialMT_Plain_24);
  display.drawString( 20,  30, temp);

  display.setColor(WHITE);
  display.setTextAlignment(TEXT_ALIGN_LEFT);
  display.setFont(ArialMT_Plain_24);
  display.drawString( 80, 30, hum);


//#########################################
// CHECK DISPLAY UPDATE
  display.setColor(WHITE);
  display.setTextAlignment(TEXT_ALIGN_LEFT);
  display.setFont(ArialMT_Plain_10);
  display.drawString( x, 55, "o");

  x++;
  if (x > 128)x = 0;
//#########################################


  display.display();


  // After Every 60 Seconds Check High Temp and send PUSH Notification

  if (((micros() - lastm1) / 1000000) > 60 || lastm1 == 0) {

    //IF TEMP MORE THAN 32
    if (t >= 32) {

      //Join Strings
      char* str1 = "Temperature: ";
      strcat(str1, temp);

      // SEND NOTIFICATION
      pb.sendNotePush(str1, "Alert");
      delay(5000);
    }

    lastm1 = micros();
  }
}
This is what i tried. You can modify the Sizes according to your needs.
Make a image of 125*61 with paint and save it as bmp Monocrome Bitmap.
Visit http://www.online-utility.org/image/convert/to/MONO
Upload this file and make a mono file.
Now Save your sketch, Go to Sketch Data Folder By Pressing Sketch > Show Sketch Folder
Create a new folder and name it "data".
Save this .mono file to this data folder.

Now press Tools > Esp8266 Sketch Data Upload
After completed, Upload the Sketch, Open Serial Monitor and have fun.
