1. Foreword
Today I am going to introduce a timer module that can be utilized on NodeMCU (on ESP8266 WiFi SoC). This timer module API is written in JavaScript language style and it’s similar to setTimeout(), setInterval(). Those who use Node.js or Javascript a lot should find it very familiar.
The original timer modules provided by NodeMCU are enough for general cases, but it’s not that handy when it comes to certain cases. For example, it is doing okay if you only got few timer tasks to run, while it can be very frustrated if you have more than 10 or 20 timer tasks to perform. And you have to well manage the situation when some of the timers are running repeatedly while the others are being released after timeout, then you will need to assign 1 or 2 variables as counters during tasking. It ends up with a messy code that can not be reused and the coding progress could be as painful as you can imagine.
This module is actually created to resolve the timeout control of multiple requests for another project. I was deeply tortured by the NodeMCU tmr module for a while. This is why I wrote a more generic timer module myself to relieve the pain encountered. That’s even greater if there is already a similar cure, which means I’m not the only one that suffered.
I am not going to explain the details of the implementation of this nodemcu-timer here. However, I have to remind you that there is still a little difference between the behaviors of my modules and Node.js style. Afterall, we don’t have the luxury of having Node.js Event Loop.
2. Introduction of nodemcu-timer
nodemcu-timer includes only four APIs : setTimeout(), clearTimeout(), setInterval(), clearInterval().
When there is no timing tasks to do, timer will stop the internal counter automatically. The internal timer will be enabled once you push the timer tasks such as setTimeout() or setInterval(). Therefore, you don’t have to worry when it will start or stop.
3. Download nodemcu-timer module
1. Clone or download it from nodemcu-timer github.
https://github.com/simenkid/nodemcu-timer
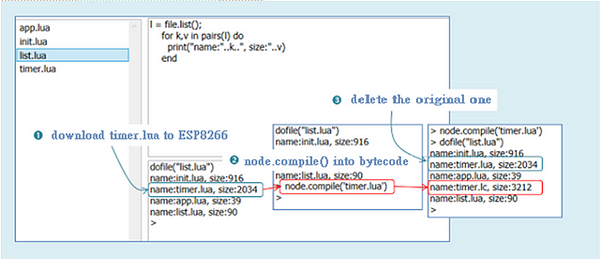
2. Pick timer.lua or timer_min.lua (the version after minification). It will be compiled into bytecode afterwards, so it doesn’t matter which one to use. If you don’t want to compile, I will suggest using timer_min.lua.
3.Download it to ESP8266.

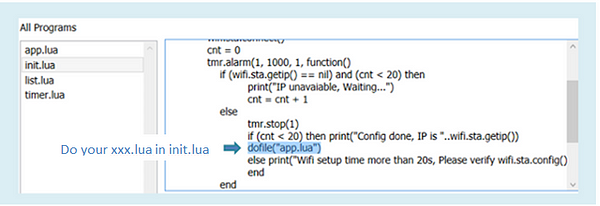
4. Write your app.js, and the download it to ESP8266.

Remember to “do” your app.js in init.lua.
4. Examples
Here is an overused example of LED controls. You can use print() to observe text messages if you don’t have any LED on hand.
4.1 Time LED On/Off
This is an example you can understand easily. LED will be turned on and off for 1s each repeatedly. The API interface is timer.setInterval(callback, delay). The callback function is your task and the delay (in ms) is the period between each repetition. My LED is set to active-low by the way.
local timer = require 'timer'
local LED_PIN1 = 0
gpio.mode(LED_PIN1, gpio.OUTPUT)
local sw1 = true
timer.setInterval(function ()
    if (sw1) then
        gpio.write(LED_PIN1, gpio.LOW)
    else
        gpio.write(LED_PIN1, gpio.HIGH)
    end
    sw1 = not sw1
end, 1000)
4.2 LED Tally Lights
The goal of this example is to design a function of blinking multiple LEDs and the API interface is blinkLED(led, times, interval). You can select which LED to blink and set the number of times & interval you would like to see.
Now I’m going to light three LEDs with different blinking frequencies and different number of times. It’s worth mention that blinkLED() uses closures in Lua and blinkLED() is also a reentrant function, so you don’t have to use timer IDs to manage your timer resource.
After you execute the app.lua, the program will trigger the blinking of three LEDs after 1234ms, 3528ms, and 5104ms each separately. They each will blink 5, 3, and 10 times.
local LED_PIN1, LED_PIN2, LED_PIN3 = 0, 1, 2
gpio.mode(LED_PIN1, gpio.OUTPUT)
gpio.mode(LED_PIN2, gpio.OUTPUT)
gpio.mode(LED_PIN3, gpio.OUTPUT)
function blinkLED(led, times, interval)
    local sw, count, tobj = true, 0
    tobj = timer.setInterval(function ()
        if (sw) then
            gpio.write(led, gpio.LOW)
        else
            gpio.write(led, gpio.HIGH)
            count = count + 1
        end
        sw = not sw

        if (count == times) then
            timer.clearInterval(tobj)
            gpio.write(led, gpio.HIGH)
        end
    end, interval)
end
timer.setTimeout(function ()
    blinkLED(LED_PIN1, 5, 560)
end, 1234)
timer.setTimeout(function ()
    blinkLED(LED_PIN2, 3, 1024)
end, 3528)
timer.setTimeout(function ()
    blinkLED(LED_PIN3, 10, 200)
end, 5104)
Demo Video:
5. Postscript
For anyone who thinks that blinking a few LEDs is not a big deal, you can try to write the above examples with the original tmr modules and see how it goes. Then try to write an example of 20 LEDs working at the same time, and you will find out how useful this nodemcu-timer is. This is exactly the benefit of abstraction of timer functions.
Additionally, you can write a complex program with a simpler style by using this nodemcu-timer module. Moreover, if you would like to write some event-driven applications, your coding can be more beautifully organized when it comes to situations like using event emitters/listeners. Next time I‘ll introduce you lua-events module, which comes in handy together with nodemcu-timer module.
Original post:
https://medium.com/@coold8d/this-is-how-you-use-the-timer-on-nodemcu-esp8266-b93574b444ce#.qtp8qj910